

This ESP8266 default module that works by AT commands, thanks to the contributions of the community has made integration with Arduino IDE.
This module (ESP8266) integrates the capabilities of an Arduino + Wifi (Ethenet) and easily the perfect combination for more or less one dollar, just personally I use in my applications in industrial integration, this module is perfect.

Installing ESP8266 in Arduino IDE is only valid from version 1.6.4 and above, in my case there are newer versions but I liked the version 1.6.4 and it worked perfect.
Video step by step explanation Installation and configuration Arduino IDE
Materials
1 ESP8266 - 01
1 Conventer FTDI Usb - ttl serial
3 Regulator de 5v a 3.3v
2 Pushers
1 resistor10k
1 Diode Led
Connections
SW1 = GPIO 0 (this pin to LOW = Bootloader Mode - Programming Mode)
SW2 = RST Reset (reset pulse module)

ESP8266 PINOUT

INSTALLATION, CONFIGURATION AND PROGRAMMING
With the next step you programmed your ESP8266 with Arduino IDE:
Step 1 . Download copy Boards Github: https://github.com/esp8266/Arduino

Step 2 . Open Preferences Arduino IDE and paste additional board
http://arduino.esp8266.com/stable/package_esp8266com_index.json

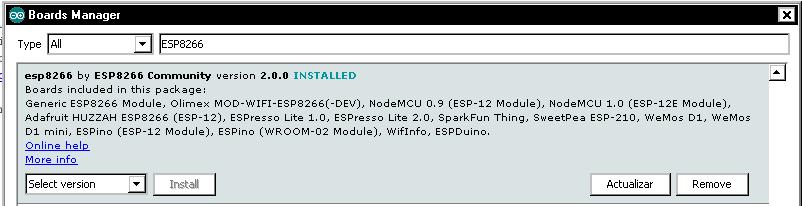
Step 3. Open Board Manager

Step 4. Search ESP8266 install library
Step 5. Open Board to select and configure ESP8266 Generic.

Step 6. Prepare Blink code example using the GPIO 2 output.

Step 7. Place GPIO0 (SW1) to position LOW Bootloader mode

Step 8. A pulse SW2 (Reset) and SW1 = LOW

Step 9. Keep GPIO SW1 = LOW
Step 10. Download code (Blink)

- Uploading Code

- The ESP8266 and FTDI module should flash

- Code uploaded to ESP8266

Step 11. Switch SW1 and SW2 Reset with a pulse (RST)

Step 12. RUN mode, the program should run normally
Step 13. Connect diode led to GPIO 2

Ready....
If set again ESP8266 mode AT commands with the same circuit and can configure the following video by Default, upload firmware by default.
ESP8266 firmware update with Flasher ESP8266
More info:
Youtube Channel
No hay comentarios.:
Write comentarios