Homepage

sábado, 12 de noviembre de 2016

Tutorial ESP8266 Control Servo Node-RED MQTT (Mosquitto) IoT #2


This time the integration of ESP8266 and the Node-RED platform has been made integrating an actuator in this case a servo controlled by PWM with rotation from 0 to 180 degrees.
From an HMI or SCADA Web creator on Node-Red-Dashboard using as base the MQTT Protocol and pubsubclient library converting the ESP8266 into MQTT Client.


Note: To successfully complete this tutorial you must perform the following tutorials.
Previous tutorials Recommended
icstation.com
Tutorial 1 : Install Lubuntu (Ubuntu)
Tutorial 2 : Installation node red platform
Tutorial 3: Installation Node Red Dashboard
Tutorial 4: Installation Modbus TCP IP in Node Red
Tutorial 5: Installation of Mosquitto Broker MQTT in Lubuntu
Tutorial 6: Program ESP8266 con Arduino IDE
Tutorial 7: ESP8266 and Node-RED MQTT GPIO  # 1


Arduino IDE
The ESP8266 module has been configured as an MQTT client, as subscriber of the "servo" topic, the ESP8266 will receive a value from 0 to 100% and will convert it from 0 to 180 degrees for servo control via PWM by GPIO 02.


Mosquitto MQTT Broker
Previously it has been installed in a computer with lubuntu (Ubuntu) Linux, the server Broker MQTT which performs the management of messages in the network, Mosquitto has been used in this case.

Node-Red
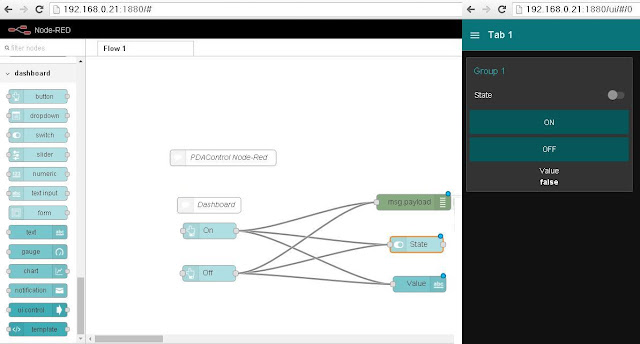
A sequence of nodes has been created to send data from the Dashboard.


                                                          Node-RED-Dashboard

                                                            View Tablet


                            Video Tutorial ESP8266 Control Servo  MQTT Node-Red  IoT #4 
  

Materials 
1 ESP8266 01 
1 Regulator LDV33CV  5 a 3.3V
1 Chip FTDI Serial
1 Servo  Mystery control PWM

Connections

Where to buy?
icstation.com 
ESP8266 01 (ESP 01)

Downloads:
Github  Arduino IDE code ESP8266 MQTT
Github pubsubclient  Library 
Node Red  import code example

References
icstation.com
Tutorial 1 : Install Lubuntu (Ubuntu)
Tutorial 2 : Installation node red platform
Tutorial 3: Installation Node Red Dashboard
Tutorial 4: Installation Modbus TCP IP in Node Red
Tutorial 5: Installation of Mosquitto Broker MQTT in Lubuntu
Tutorial 6: Program ESP8266 con Arduino IDE
Tutorial 7: ESP8266 and Node-RED MQTT GPIO  # 1

node-red-dashboard
Nodered.org
github.com/node-red
Nodejs.org

More Information:

Youtube Channel:

miércoles, 9 de noviembre de 2016

Tutorial ESP8266 and Node-RED MQTT GPIO (Mosquitto) # 1

To integrate the module ESP8266 with node-red IoT platform has been used MQTT protocol, there are client libraries for esp8266 as MQTT in this case I decided to use the library pubsubclient.

This example will receive Node Red that receives data from the ESP8266 and allow control a LED connected to GPIO 02 from a dashboard created in Node Red Dashboard .


Arduino IDE add the pubsubclient library using the search engine libraries or manually by downloading the library and storing it in their respective folder for libraries.

Note: To successfully complete this tutorial you must perform the following tutorials.
Previous tutorials Recommended
icstation.com
Tutorial 1 : Install Lubuntu (Ubuntu)
Tutorial 2 : Installation node red platform
Tutorial 3: Installation Node Red Dashboard
Tutorial 4: Installation Modbus TCP IP in Node Red
Tutorial 5: Installation of Mosquitto Broker MQTT in Lubuntu
Tutorial 6: Program ESP8266 con Arduino IDE


Arduino IDE code
Arduino IDE code performs several steps but definire major, Broker connection with MQTT, function post (send messages) even specific topic and subscribe function (receive messages) even specific topic.
Note: At the bottom of the post code Full IDE arduino

1 .Parameters Network 
Set parameters network  PASSWORD  and SSID is required to have previously installed a MQTT Broker server which performs the function server broker, in this case I use Mosquitto MQTT.

const char* ssid = "##############";
const char* password = "###############";
const char* mqtt_server = "192.168.0.19";

2. Function publish ("topic" message)
 client.publish("event", "hello world");

3. subscribe Function ("topic")
the subscribe function makes a call to the callback function for data reception
  client.subscribe("event");

4. callback function
This function enter 3 personal parameters of the library pubsubclient.h topic, payload (load) and size, performs printing  of the topic and the message, to turn on the LED diode sweeps payload in a specific position to determine the state 1 or 0.

void callback(char* topic, byte* payload, unsigned int length) {
  Serial.print("Message arrived [");
  Serial.print(topic);
  Serial.print("] ");
  for (int i = 0; i < length; i++) {
    Serial.print((char)payload[i]);
  }
  Serial.println();

  // Switch on the LED if an 1 was received as first character
  if ((char)payload[0] == '0') {
     Serial.println("LOW");
    digitalWrite(2, LOW);   // Turn the LED on (Note that LOW is the voltage level
    // but actually the LED is on; this is because
    // it is acive low on the ESP-01)
  } 

 if ((char)payload[0] == '1') {
    Serial.println("HIGH");
    digitalWrite(2, HIGH);  // Turn the LED off by making the voltage HIGH
  }

}

Node Red
1 Node client receiving messages MQTT (subscribe) from ESP8266 through the topic "event" node debugging and debug.
2 Building 2 button "On" "Off" for sending node values MQTT (publish) to ESP8266 topic "event"
3 Node text text output to display status LED diode.
Note: At the bottom of the post code on Github Import Nodes


Design Node Red Dashboard 
Organization Tabbed Widgets and Groups


Visualization Node red Dashboard 


Conections ESP8266


Where to buy?
icstation.com 
ESP8266 01 (ESP 01)

Downloads:
Github  Arduino IDE code ESP8266 MQTT
Github pubsubclient  Library 
Node Red  import code example

References
icstation.com
Tutorial 1 : Install Lubuntu (Ubuntu)
Tutorial 2 : Installation node red platform
Tutorial 3: Installation Node Red Dashboard
Tutorial 4: Installation Modbus TCP IP in Node Red
Tutorial 5: Installation of Mosquitto Broker MQTT in Lubuntu
Tutorial 6: Program ESP8266 con Arduino IDE


node-red-dashboard
Nodered.org
github.com/node-red
Nodejs.org

More Information:

Youtube Channel:


sábado, 5 de noviembre de 2016

Installation Mosquitto Broker MQTT in lubuntu (Ubuntu) Linux


That is MQTT ?
In short MQTT is a TCP / IP protocol lightweight messaging, the model is publication - subscriber requires a message broker  which is responsible for directing recipients through a topic  in common.
It is considered to Andrew James Stanford-Clark as the author of this protocol.
More information MQTT Wikipedia.
Official Website: mqtt.org


Application
I believe that this protocol is very practical and is currently implemented in IoT and M2M "machine-to-machine" applications, field application in this case would be sending monitoring and control data between servers, sensors and actuators.

Previous tutorials Recommended
Tutorial 1 : Install Lubuntu (Ubuntu)
Tutorial 2 : Installation node red platform
Tutorial  3 : Installation Node Red Dashboard
Tutorial  4:  Installation Modbus TCP IP in Node Red


Architecture MQTT Protocol 

Broker Mosquitto MQTT
Eclipse mosquitto ™ It is open source, it is a message broker this intermediary MQTT allows the connection of devices.
Official Website: mosquitto.org


Installation of Mosquitto Broker MQTT in lubuntu (Ubuntu) Linux

MQTT to connect devices with Node-red I use mosquitto as Broker, this is an extra complement Node red in the next tutorial installation.

Enter the terminal lubuntu command as root.
Add mosquitto repositories dev
sudo apt-add-repository ppa:mosquitto-dev/mosquitto-ppa 

Update repositories linux
sudo apt-get update

Install broker mosquitto
sudo apt-get install mosquitto

Install development libraries
sudo apt-get install libmosquitto-dev

Installing client MQTT
sudo apt-get install mosquitto-clients

Check that mosquitto is running
sudo service mosquitto status

Ready to have fun ...


Customer tests Mosquitto MQTT in lubuntu (Ubuntu) Linux
Subscriber
Our client is suscruibira the theme or topic  "Sensor_MQTT" meaning that all published messages associated with this topic will be received.

mosquitto_sub -h localhost -t "Sensor_MQTT" -v

Publisher
Our client publish the message "Error Sensor" through the topic "Alert_MQTT"

mosquitto_pub -h localhost -t "Alert_MQTT" -m "Error_Sensor"

Ready to have fun ...


References
Tutorial 1 : Install Lubuntu (Ubuntu)
Tutorial 2 : Installation node red platform
Tutorial  3: Installation Node Red Dashboard
Tutorial  4: Installation Modbus TCP IP in Node Red

node-red-dashboard
Nodered.org
github.com/node-red
Nodejs.org

More Information:

Youtube Channel:


jueves, 27 de octubre de 2016

Installation Node Red dashboard


Node red Dashboard
Node red has dashboard to create and view dashboards to interact with the devices in the internet of things.
There was an earlier version call node-red-contrib-ui which was replaced by node-red-dashboard created by Dave Conway-Jones (dceejay) thanks for your great contribution.


In this case we will install this add to our Node-red, previously installed  Lubuntu (Ubuntu) in next tutorials integrate devices already used previously as Arduino and ESP8266.

Previous tutorials
Tutorial 1 : Install Lubuntu (Ubuntu)
Tutorial 2 : Installation node red platform

Github
github.com/node-red/node-red-dashboard

Dashboard installation for developers

Enter a folder / node-red
 cd ~\.node-red\node_modules 

Copy from github repositories
git clone https://github.com/node-red/node-red-dashboard.git

Enter folder node-red-dashboard
cd node-red-dashboard

Build application
npm install

Back to Folder node-red
cd ..

Run node red
node red 


Dashboard widgets available


Example
Organization and Design Dashboards

The dashboard tab  to organize our dashboard by tabs  and groups since it does not have a tool own design, but consider this way very practical to design without worrying about compatibility design screens different resolutions on devices like smartphones tablets and  pc.


Visualization from PC

Visualization from Tablet  7"


Visualization from Smartphone 4"


Video Complete


Ready to have fun ...

References
Tutorial 1 : Install Lubuntu (Ubuntu)
Tutorial 2 : Installation node red platform
node-red-dashboard
Nodered.org
github.com/node-red
Nodejs.org

More Information:

Youtube Channel:


miércoles, 26 de octubre de 2016

Installation node Modbus TCP Node Red

In the search for attachable communication protocols Node-Red I found thanks to the collaborative development a library or nodes for communication Modbus TCP IP, the following tutorial is indicated as installing the nodes in lubuntu (Ubuntu).

Previous tutorials Recommended
Tutorial 1 : Install Lubuntu (Ubuntu)
Tutorial 2 : Installation node red platform
Tutorial  3 :  Installation Node Red Dashboard


This library   node-red-contrib-modbustcp  was created by  Jason D. Harper  was based on the jsmodbus library, this library allows our Node-Red server is configured as master Modbus TCP, it contains 2 nodes one reading and one writing .

 - your user linux -  /node-red/node_modules/
npm install node-red-contrib-modbustcp

Reading from Master (Node Red) to Slave

Writing from Master (Node Red) to Slave


Complete Video  Install Modbus TCP IP in Node Red


                                              Complete Video  Test Modbus TCP IP in Node Red


Ready to have fun ...


lunes, 17 de octubre de 2016

Installation Node red Platform


Installing Node-Red Platform

Longtime had wanted to try this platform called Node-red created by IBM, was developed in nodejs, Node red is developed by Nick O'Leary and Dave Conway-Jones thanks for their contributions.
But that is Node-red ?
It is an open source graphical tool based connection nodes containing API'S and / or services for communication and / or connecting devices to the Internet
of things, has a friendly web interface contains a variety of basic and complex functions IoT, there is also an online version of node red called IBM bluemix.
There are many tutorials to install Node-red on a local server, but these tutorials although very complete I did not work properly, I decided collect the steps to install Node-red in Linux, in this case Lubuntu (Ubuntu) I hope you will his liking this guide.
Applications
No need to be a great programmer to use Node-red, although his native language is javascript with a few tutorials will be very easy to make applications Arduino or ESP8266 or other platforms.
Currently installed Node red on Raspberry pi, excellent, although effected, since testing I decided to install it on Lubuntu (Linux) by hardware capacity.
Tutorial Install lubuntu


For testing I have previously installed a virtual machine with lubuntu, through the SSH client PuTTY equivalent to a command terminal.

Let's start with the nodejs and Node-red installation

Repository Update
sudo apt-get update

Install nodejs.
sudo apt-get install node.js -y
sudo apt-get install nodejs-legacy

Install git
sudo apt-get install git -y

Clone repository with source code on github Node-red
git clone https://github.com/node-red/node-red.git

Enter node red  folder
cd node-red

Install npm
sudo apt-get install npm -y

Install dependencies Node-red
npm install

Top folder
cd ..

Install grunt-cli globally
sudo npm install -g grunt-cli

Enter node red  folder
cd node-red

build and run Node-red application
grunt build 
 node red 


Ready to have fun .....

Video Complete

Install lubuntu (Ubuntu) from Scratch


I decided to create my desktop a virtual machine in VirtualBox with Lubuntu (Linux) combination LXDE and Ubuntu, the purpose of this virtual machine is testing the Platform IoT Node-Red Interconnect devices like Arduino and ESP8266 among others .
Official Pages lubuntu.net & lubuntu.me


VirtualBox is installed on Windows, download the latest version of lubuntu in this case lubuntu-14.04.5-desktop-i386.iso for later installation.
Architecture


Clarifying that current and commonly Node-Red is installed on the platform Raspberry pi, a very practical and excellent use for this great device, but I decided to virtualize Lubuntu Linux for practicality, lightness and stability of hardware, there are also other current platforms excellent virtualization as docker among others, I hope this tutorial is taken as an introduction to those who do not conecen linux and a reminder to those already familiar with this powerful operating system and .. have fun.


Complete video 


Advantages in this case
-Restoration fast image copies virtualbox in case of errors.
-Size Image virtualbox approx 4GB
-Hardware -stability

References

More Information

Youtube channel
PDAControl